

How To Make Triangle Stickers Youtube Silhouette
Hullo Daydreamers!
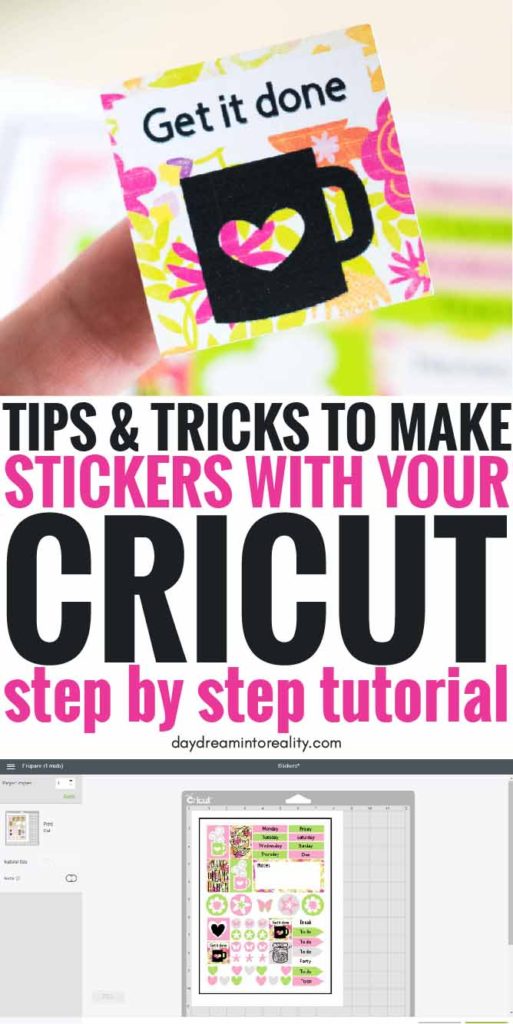
Today y'all are going to learn how to make the near beautiful stickers with your Cricut Maker or Explore.
Yas!
Not but volition I teach you how to make your stickers from scratch, but I volition also provide you with 6 different types of layouts that volition help y'all build and create the most stunning stickers in the world.
Before we become into a pace-by-pace tutorial I want to give you lot a picayune preview of the things I will exist covering for y'all on this article (I don't desire you to get lost).
- Print then Cut: the choice in Cricut Design Space that allows you to cut your stickers.
- Overview of your machine specifications and size limits.
- Stride past Pace tutorial How to Brand Stickers within Cricut Design Space.
- Examples of how to use the Free Templates I provided you lot with to Make Stickers.
I am sure that If you follow this tutorial to the tee, you will be empowered to make stickers any fourth dimension, for any occasion.
Are yous fix?
Let's Daydream Into Reality?
Tip: if y'all want to learn everything you need to know about iron-on (HTV) and principal how to use it on different surfaces, make sure to check this astonishing tutorial I put together.
What is Impress so Cutting and how does information technology relate to stickers?
"Print then Cut" is the option in Cricut Design Infinite that allows you to print your designs and and so cut them with your machine.
At that place are two means to tell your machine to Print and so Cut. The first one is by changing the "Functioning" from "Basic Cut" to "Standard." The 2nd 1 is flattening the layers with the "Flatten" tool located at the layers panel'due south stop.
For best practices and nil frustrations, don't worry about this during your design procedure. It will simply stress y'all out.
Merely add your shapes, text, images, and at the end, flatten the whole affair. (I will testify you this in the footstep by pace tutorial)
Notation: Although I embrace some topics of "Print then Cut" in this commodity, keep in mind that this tool is a very robust 1. Then, if you want to learn all there's to know about information technology, become alee and read my Print Then Cut Ultimate Guide.
Car and Settings for Making Cricut Stickers
There are 2 things you demand ever to make sure of when making stickers with your Cricut.
The offset one is the size. You can only Print so Cut designs that are upwardly to nine.25 x 6.75in. So cheque the size before y'all send your projection to cut, or you volition become a alarm saying the image is likewise large.
The other affair that you lot need to consider is your machine's limitations:
- If you take a Cricut Maker, yous can apply colored paper (that'due south not besides busy) and sleeky white materials.
- If you take an Explore motorcar, you need to use white paper with matte finishes.
Step by Pace Tutorial / Make Stickers with your Cricut
Now that you know your auto requirements, it'due south time for you to learn how to make stickers.
Materials
- Cricut Maker/Explore
- Sticker Paper
- Printer
- Fine Point Blade
- Light Grip Mat (blueish)
Note: I usually love Cricut's products. However, their sticker paper is very thick and got stuck in my printer (I have an HP 4520 Printer) so, if you oasis't bought your sticker paper, I recommend you to purchase the Silhouette Brand.

If yous already have the Cricut Sticker paper, endeavor saving the print and take it to Staples or Office Depot, for them to print it. Or if that'due south too much hassle get the other one.
Time is coin!
Creating a Methodology
Since yous can apply text, images, shapes, and pretty much anything in Design Infinite to make stickers, you may get overwhelmed and don't where to start.
So, for you to take a pleasant experience with making stickers, I've developed a "frustrationproof" method.
These are the steps we are going to follow:
- Create a layout (By adding shapes)
- Add Color or Patterns
- Add together text and Images
- Cheque the size and "Flatten."
- Cut your stickers
When you follow this order, you can concentrate and focus on one step at a time, and that, my friend, is powerful!
Note: Save your projection equally you go. It'south very fourth dimension-consuming, and Cricut doesn't have backup options.
Footstep ane – Create a Sticker Sheet Layout
Since Cricut Design Infinite only allows us to Print then Cutting in a size no bigger than 9.25 x 6.75in. I recommend you add a guideline and then yous are ever aware of your space and can create a Sticker Canvass Layout.
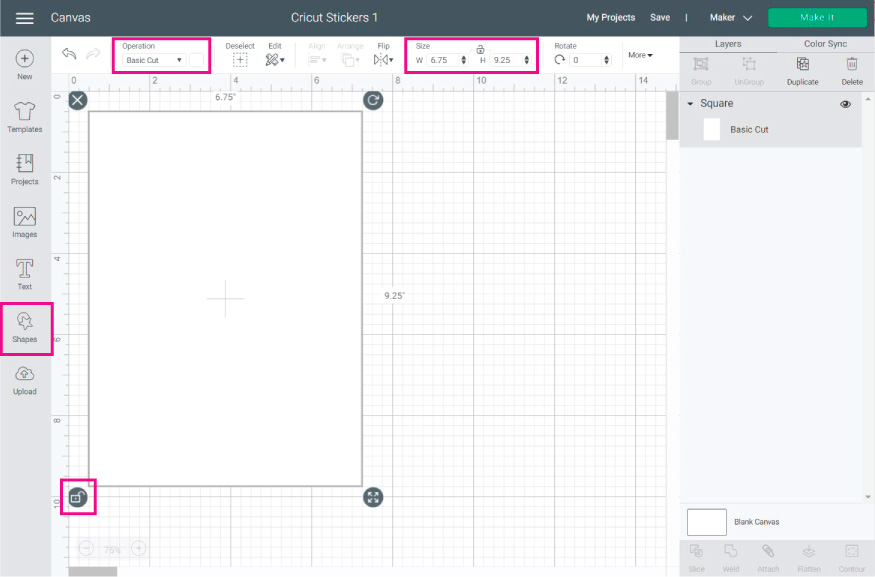
To add the guideline, click on the shapes push located on the left of the canvass and select the square choice. Then (while selecting the square) become to the edit carte on pinnacle of the sail and click the little foursquare in the middle to unlock proportions. (we will be using this term throughout this tutorial)
So on W (width), type in 6.75 and, on H (height), type in 9.25. Afterward resizing the square, alter the operation colour for white, then information technology'south easier for you to have a better idea of your design.
Note: Cheque out my how-to edit shapes If you feel confused with editing the proportions, etc.
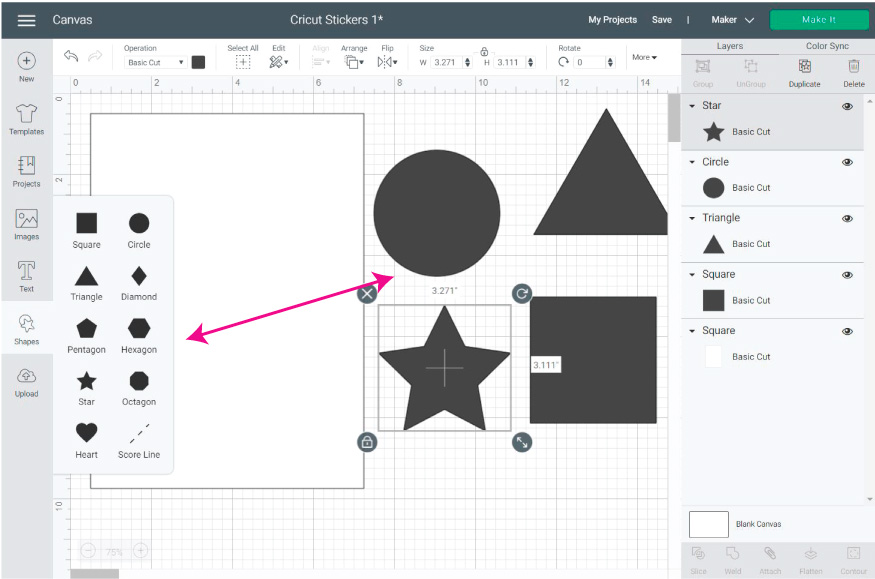
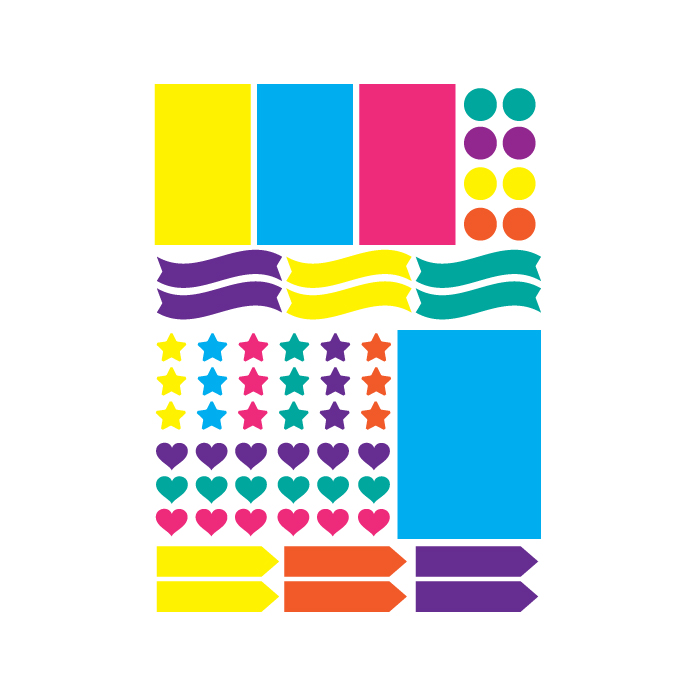
Later on creating your guide, add together the shapes y'all desire for your stickers. Cricut has ix different options for you to cull from. For this tutorial, I used squares, hearts, circles, and triangles.
What we demand to do now is fill our guide with all sorts of unlike shapes. Don't forget to unlock proportions so you can create all kinds of rectangles.
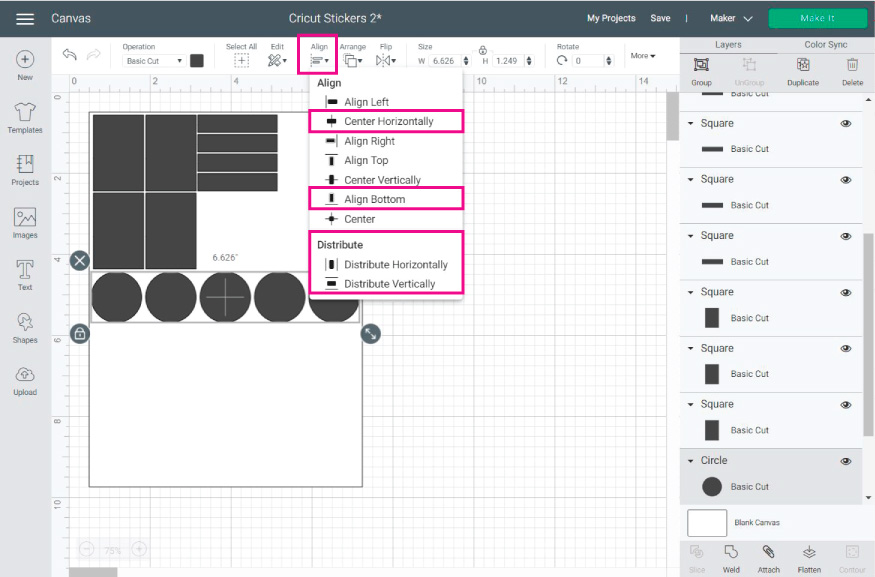
Tip 1: Use the marshal option to keep your shapes and all the other shapes you're adding to your sticker layout organized.
Select the elements you want to align, and depending on how you want to align them utilize the different options.
In most cases, you will exist using "Center" and "Distribute horizontally or Vertically."
Give it a attempt!
You lot will make a couple of mistakes while y'all get used to it, merely you won't go back once y'all get the hang of information technology.
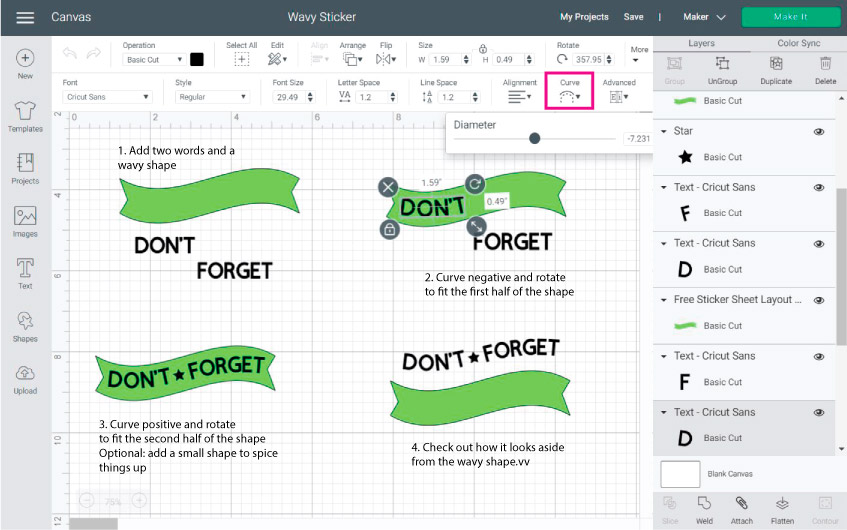
Tip two: Create different figures for your stickers. Check out the following image for a step by stride process.
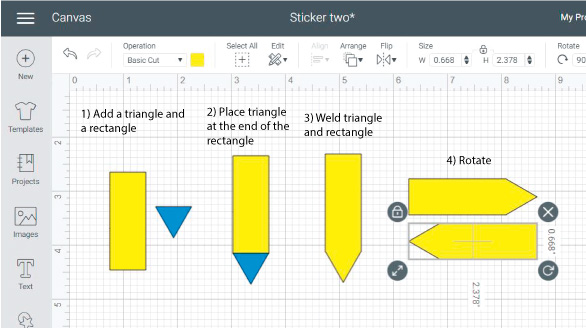
- Footstep i: Add a rectangle and triangle (you will need to rotate the triangle, so information technology's upside downward)
- Stride 2: Place the triangle at the end of the rectangle. They must be overlapping (merely a notch).
- Stride 3: Select both shapes and weld to create a new chemical element for our stickers. (Weld is located at the lesser of the Layers console)
- Stride 4: Rotate to fit your sticker layout
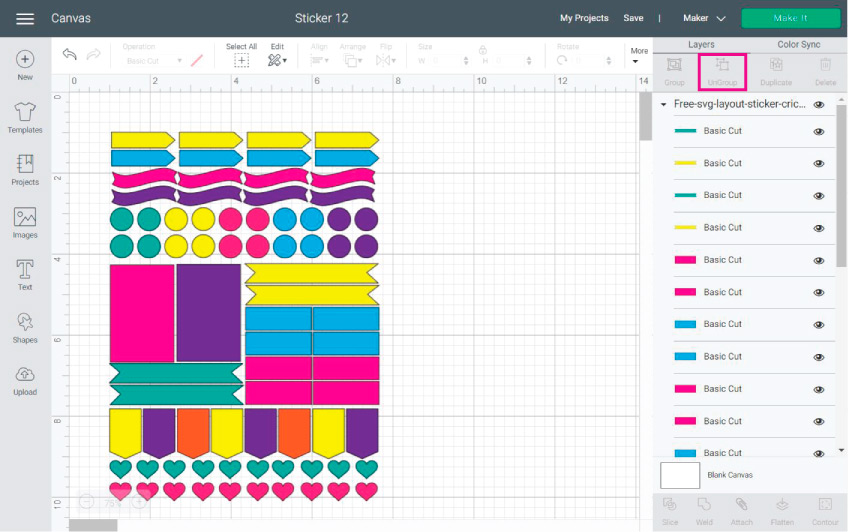
Continue calculation shapes in dissimilar sizes and permit your imagination fly! Your stickers will be and so cute at the cease.
When your layout is complete, you have to delete or hide your guide. PLEASE don't forget to practise this. Otherwise, your stickers won't cut after you flatten.
At present, select all of the shapes and change the "Operation" color to white; this will allow you to have a sharper vision of what you will be doing next.
Step 2 – Add Colors and Patterns
Information technology'southward time to add color to your stickers!
Equally I mentioned above, don't worry about "Basic Cut" or "Flatten." Nosotros will cover that after. To add together color to your sticker, you can choose a solid background or a Pattern.
Add together a Solid Color to your Stickers
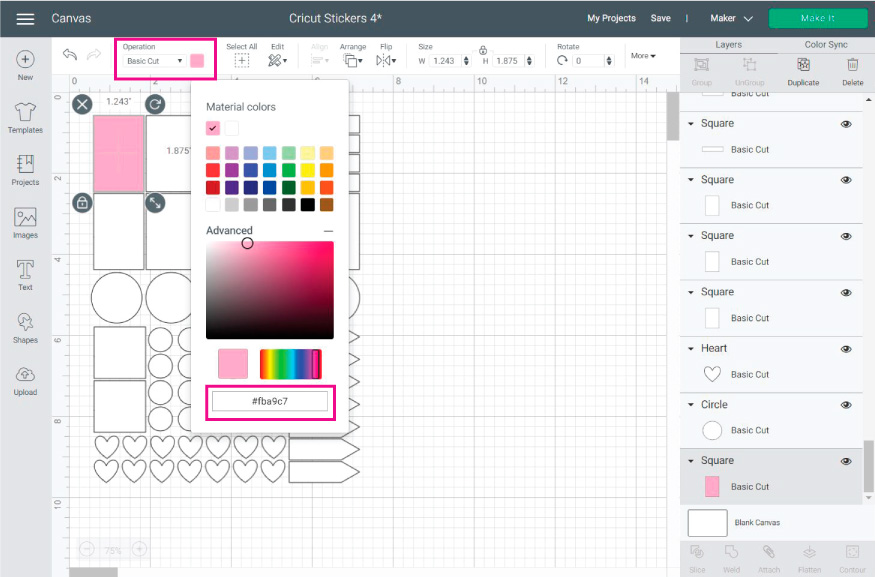
Select the element you desire to add color to and change the color box side by side to the "Operation" setting, located at the canvas expanse'southward top console.
If you click on avant-garde, you will be able to see a broader spectrum of colors, and you can too use a code to find a specific color.
Tip: To modify the color of multiple shapes simultaneously, press shift on your keyboard (at all times) and click on all of the elements you desire to edit; this besides works with patterns.
Calculation Patterns to Cricut Stickers
Patters are backgrounds you tin can use for your stickers or other "Print then Cutting" projects. There are hundreds of them for you lot to cull from.
Cricut used to charge for them, but they are free for at present, so take advantage of them.
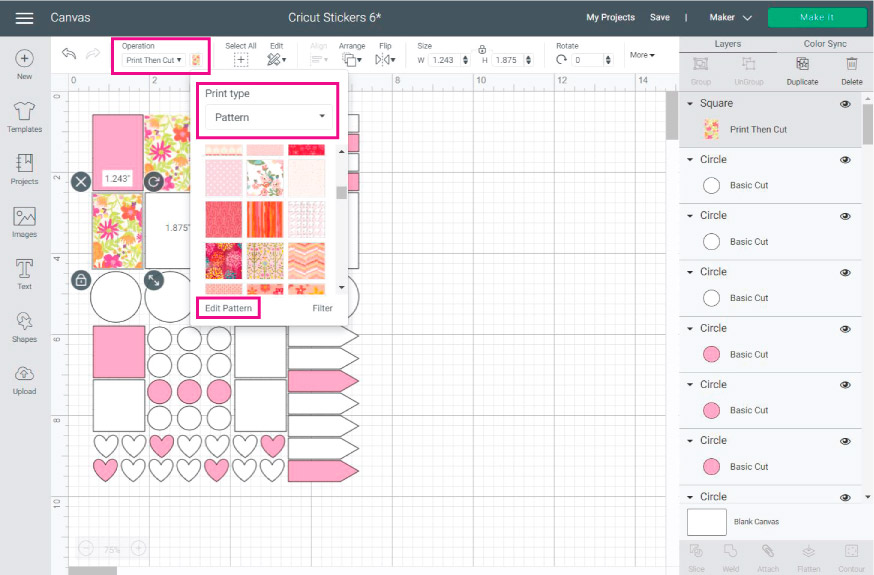
If you want to add together patterns, change the functioning to "Standard Print and then Cutting," then click on the color box next to "Operation," and from the "Print type" drop-downward menu, select "Pattern."
You volition find many patterns to choose from. Since they don't have a code, I tin can't show which 1 was used; So, y'all'll need to curlicue downwardly until y'all observe it.
When you find the pattern you want to use, make sure to explore the editing options.
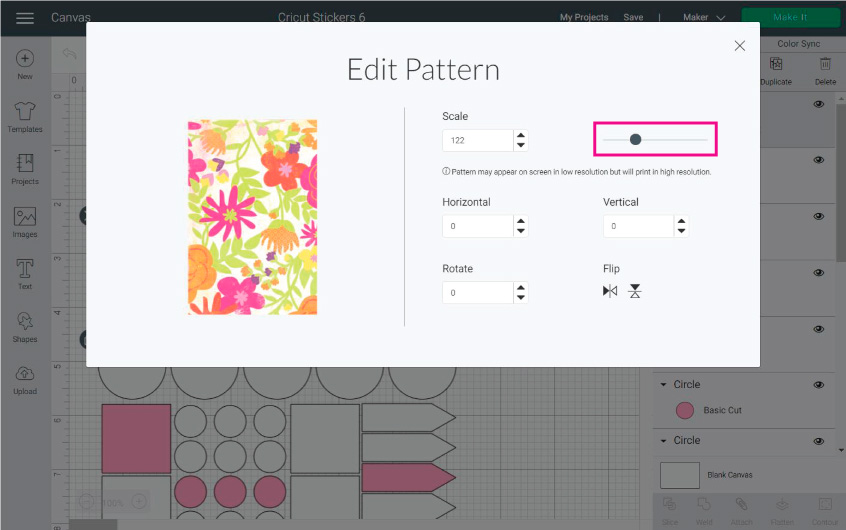
Sometimes, Patterns will wait very small; therefore, most of the time, I edit them.
The things I usually tweak are the scale and horizontal position. As you modify a Pattern, you volition see all of the changes on a little preview.
Step 3 – Add Text and Images
To add together text, click on the Text push button located on the left panel of the canvas. If you don't know how to edit text in Cricut Blueprint Infinite, make sure to read my tutorial on this topic.
Once y'all are done adding colors and patterns to your stickers go alee and blazon in the text you want to use.
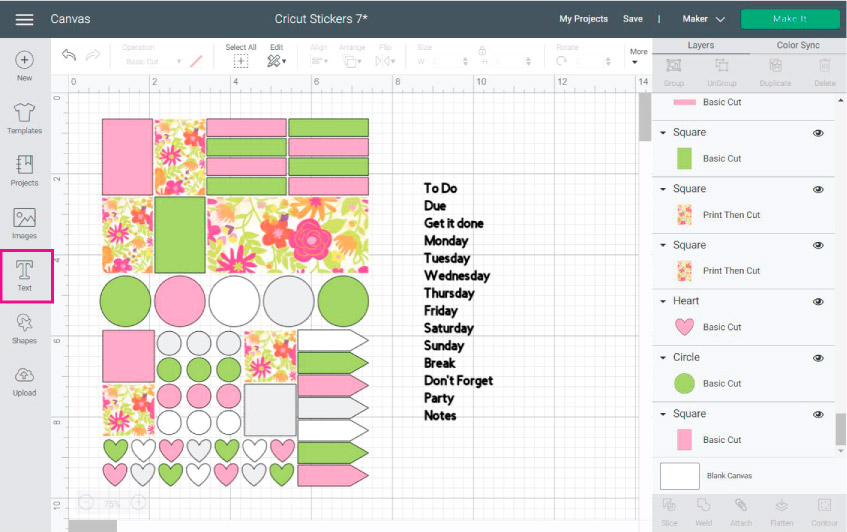
Here are some ideas for unlike types of sticker sheets:
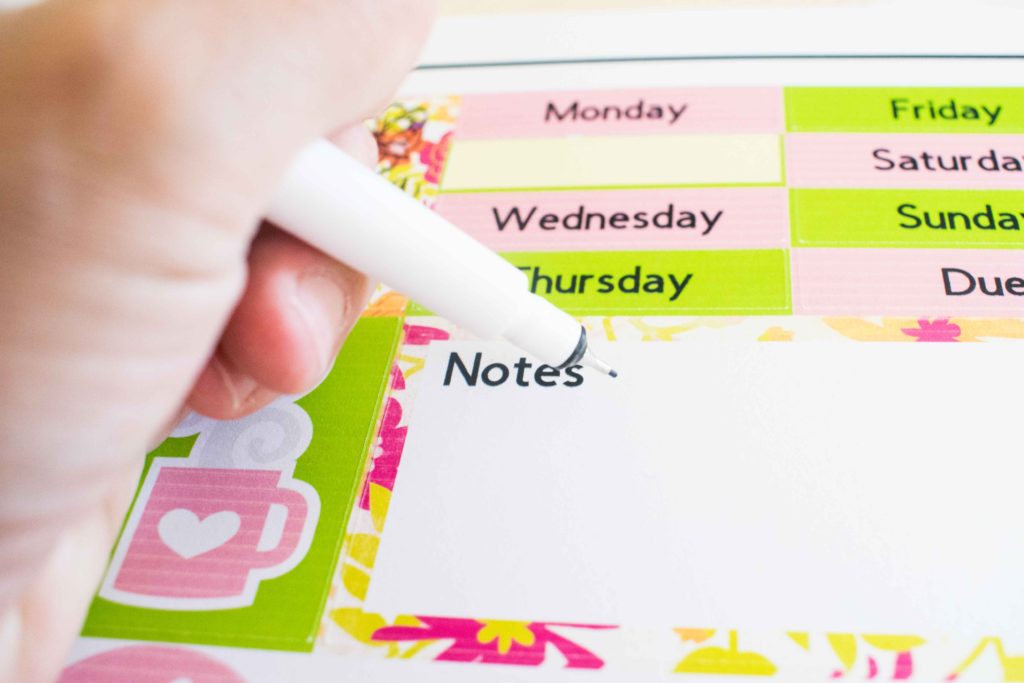
- Text for Planner Stickers: To-Do / Due / Get it Done / Days of week / Notes / Don't forget / Important / Break / Appointment… etc
- Text for leisure stickers: Beach Mean solar day / Intermission / Political party / Vacation / Snowboard Day / Engagement Dark / Ocean Vibes / Enjoy life / Brunch / Girls Night Out… etc
What I love about making Cricut Stickers is that you can personalize the text to fit your likes and life in general, and that is something you would never be able to get or purchase in a regular store.
Later on typing in your text, place information technology on the shapes you desire them to be.
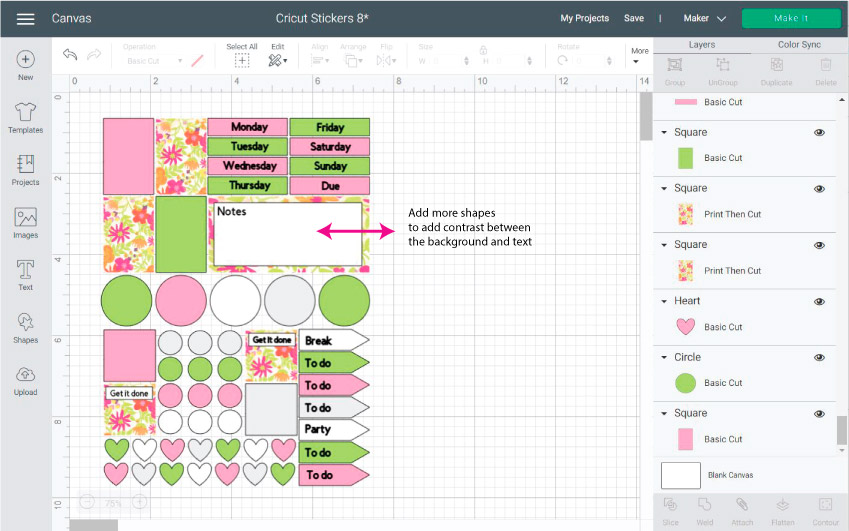
Tip: If needed, add more shapes to add contrast between the patterns and text.
Now it's time to add images to your stickers! (Click on the Images button located on the left panel of the sail)
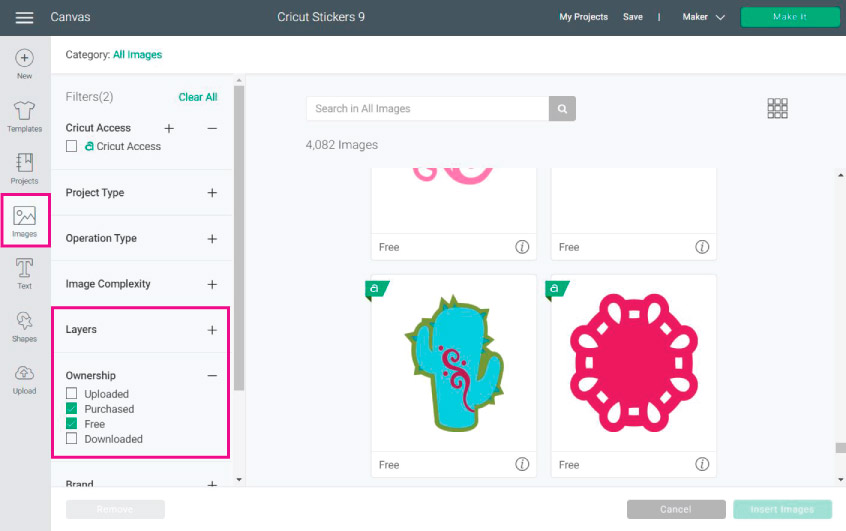
You tin can add your ain images, or you lot can also use som images Cricut's Library. They do have a membership but if you like costless stuff every bit much as I practice, filter images and select:
- My Images (cheque the ones you've uploaded to the software)
- Free (Some are always gratis, other ones are only gratuitous for a specific fourth dimension)
- Purchased (your machine comes with a set of free images)
These are the images I used (I don't know if they will exist free when you attempt to follow forth). To find them, paste the code in the search images box.
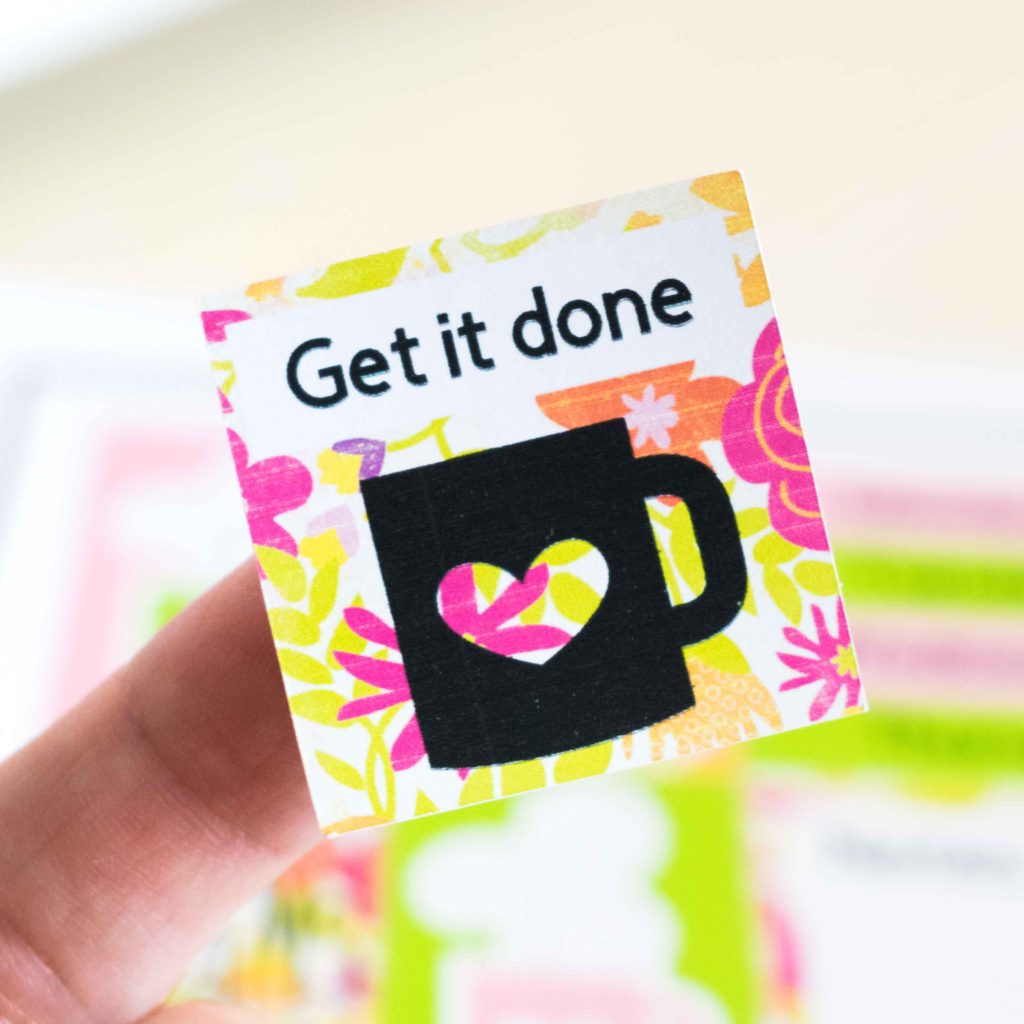
- Coffee Mug: #M3F404
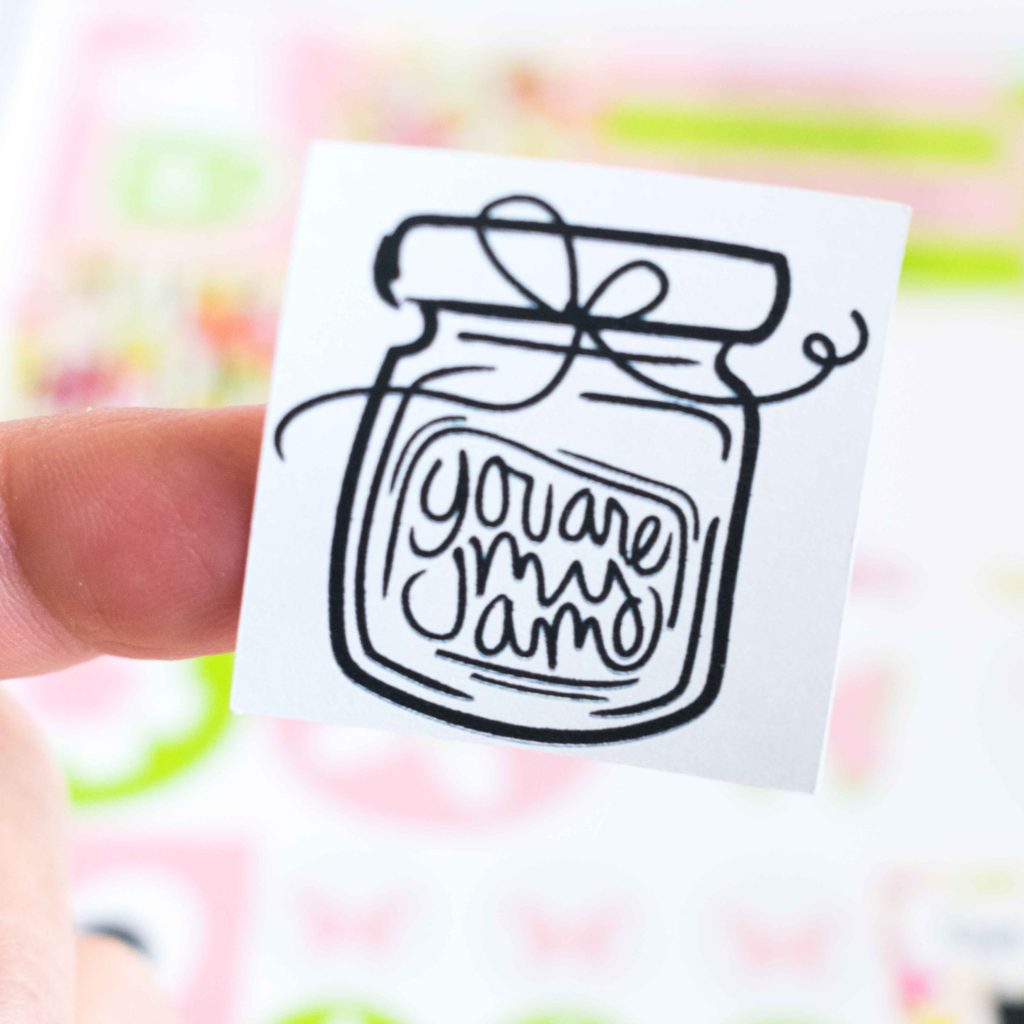
- Jam Jar: #M203B548
- Strong: #M9F82684
- Flowers: #M3D82D / #M4687B
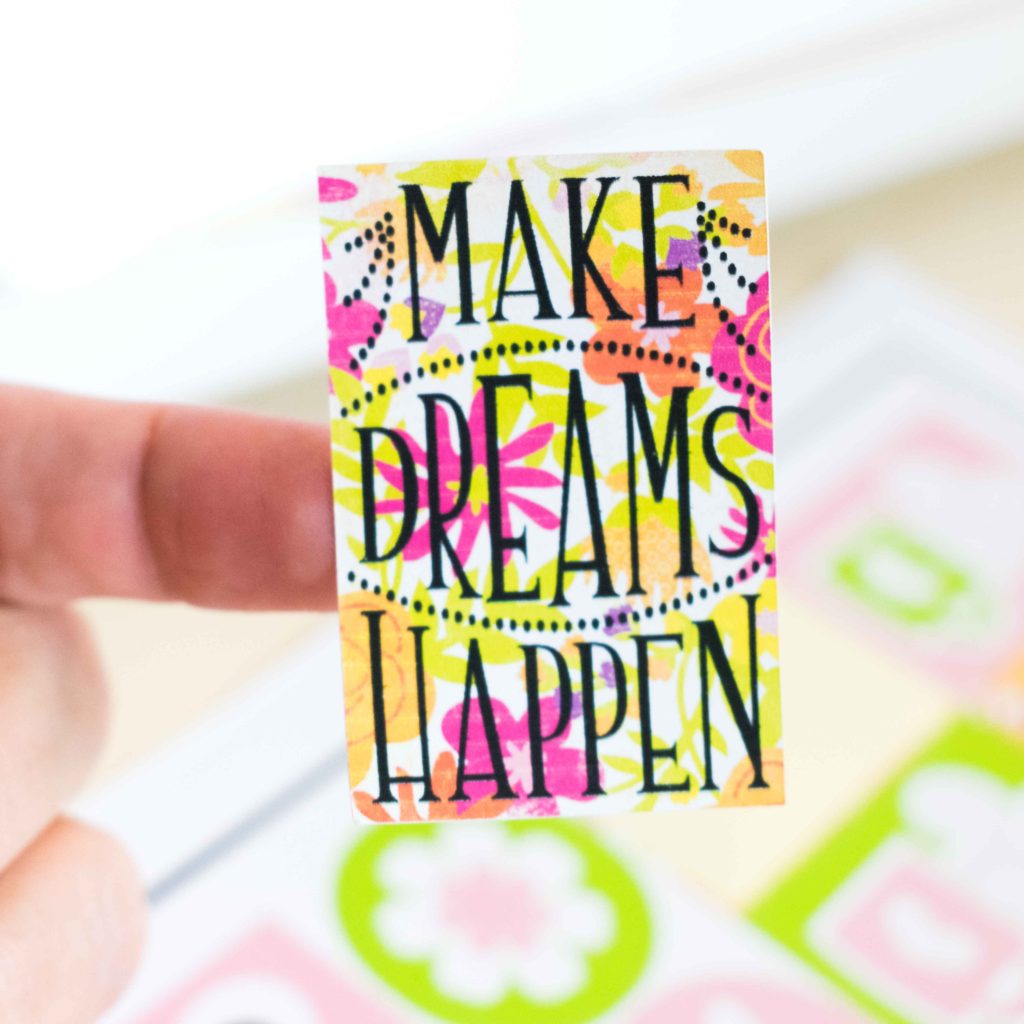
- Brand Dreams Happen: #M3D9AE98
- Butterflies: #M45BA6 (For this set of butterflies, I had to use the contour tool; read my guide to acquire how to apply this setting).
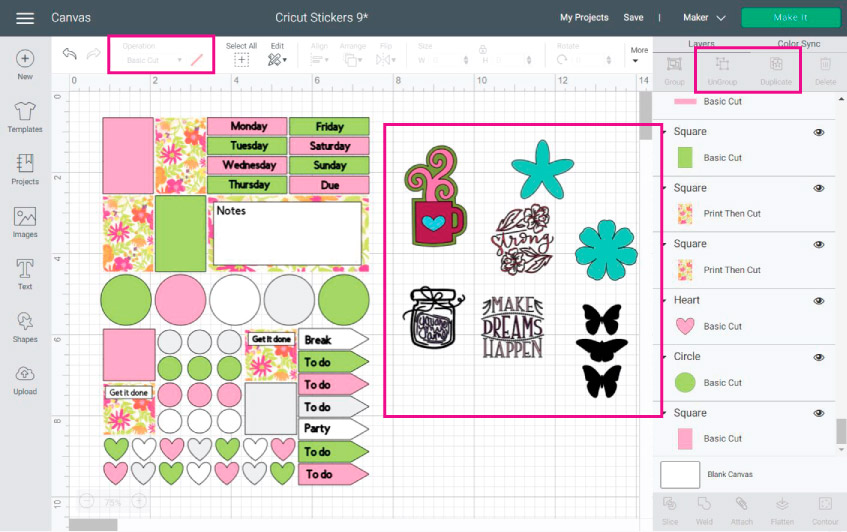
I recommend you inserting one at the time so resizing information technology considering if you add them all at the same fourth dimension, your canvass will be a mess!
Keep in mind that when you work with images, sometimes they are grouped and have unlike colors and sizes. You lot will need to ungroup them to edit the colors and size of every little element.
You may also need to alter the proportions to fit them in your sticker sheets.
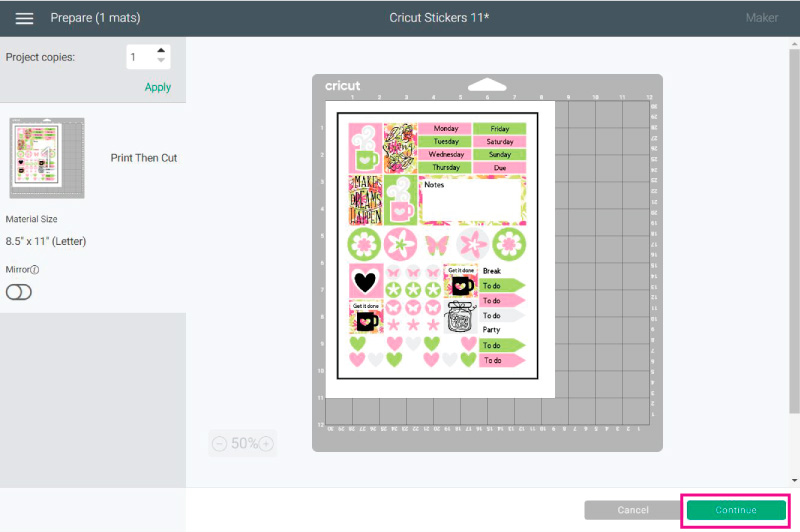
Step 4 – Check Size and Flatten
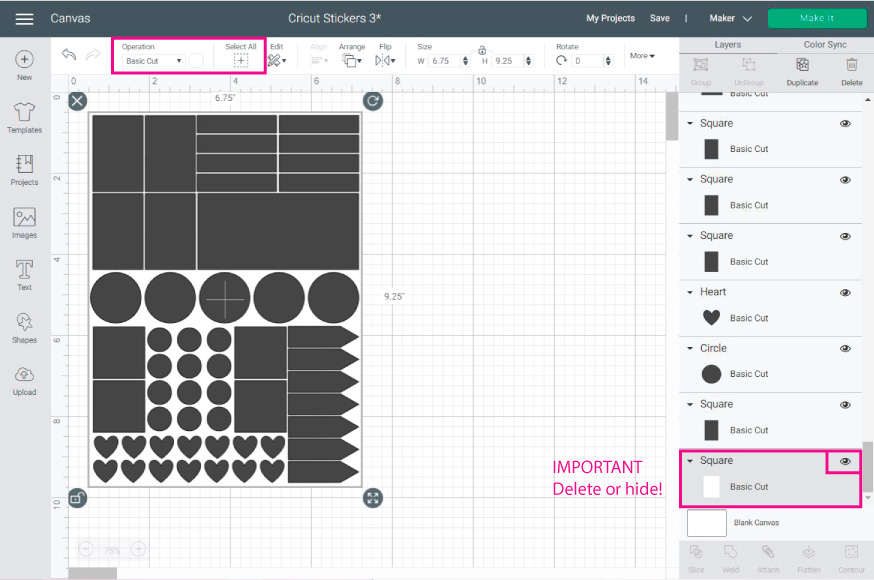
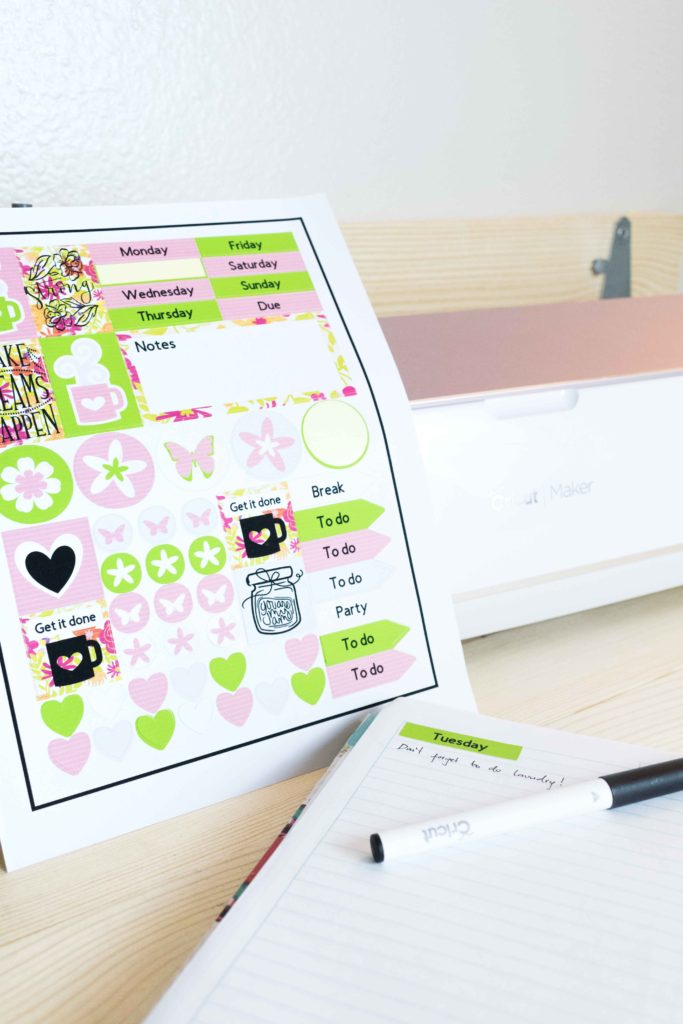
Check out how I used the images to fill the residuum of my sticker canvass. Now nosotros are about to get into some serious stuff!
Note: If y'all even so have the GUIDELINE we used at the showtime, You lot HAVE TO DELETE IT!
When y'all complete your stickers, select everything you lot accept on the canvas (that makes part of the sticker canvas) and click on the "Flatten" option located at the Layers panel'due south bottom.
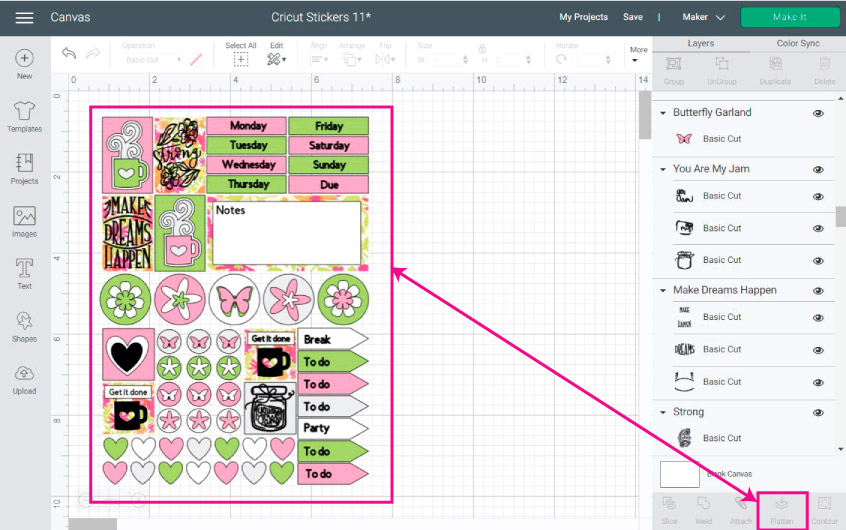
Equally you can meet in the screenshot downward below, our stickers wait then much different. Everything is on a single layer, and the blade will get through all the outlines of each shape.
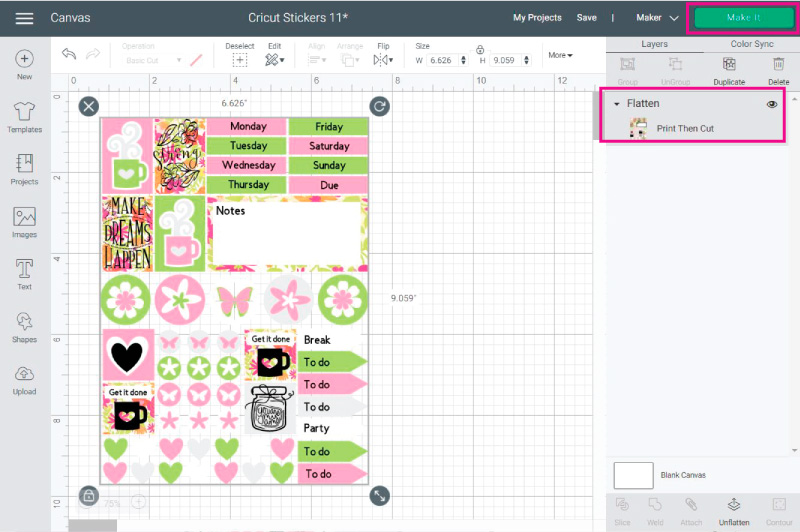
When you are prepare to cut, click on the Make information technology Button located at the upper right corner.
Finally!
Allow'south cut these cuties.
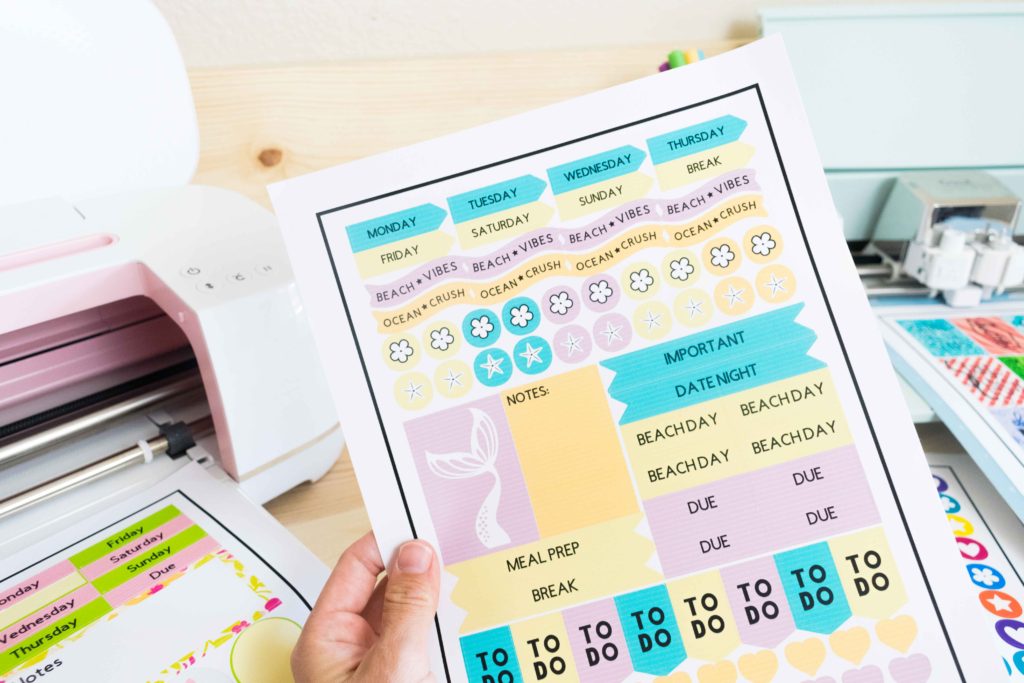
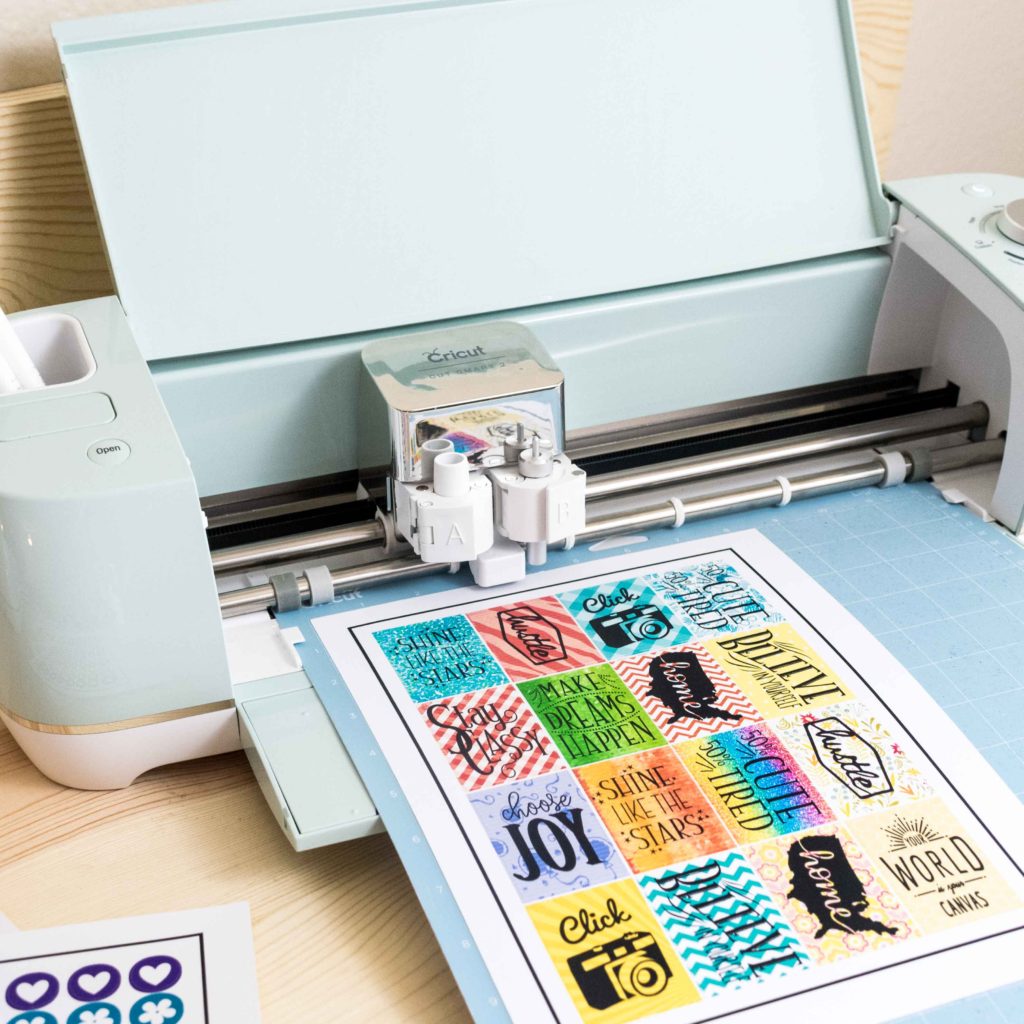
Step 5 – Print and Cut your Cricut Stickers
The following screenshot is the view that you'll accept when you start the cutting process.
We used all the space! – Sticker paper is quite expensive, so make every inch of it count.
Check out everything looks in place and hit go along. (This is how y'all need to place the printed re-create on your Mat)
Kickoff, we need to send our projection to the printer, so click on Send to Printer (leave all the default settings on) and then on Print.
WARNING: Make sure y'all print on the right side of the Sticker Paper. If you lot aren't sure what side of the paper your printer prints, use a regular piece of paper with a marking on information technology to find out.
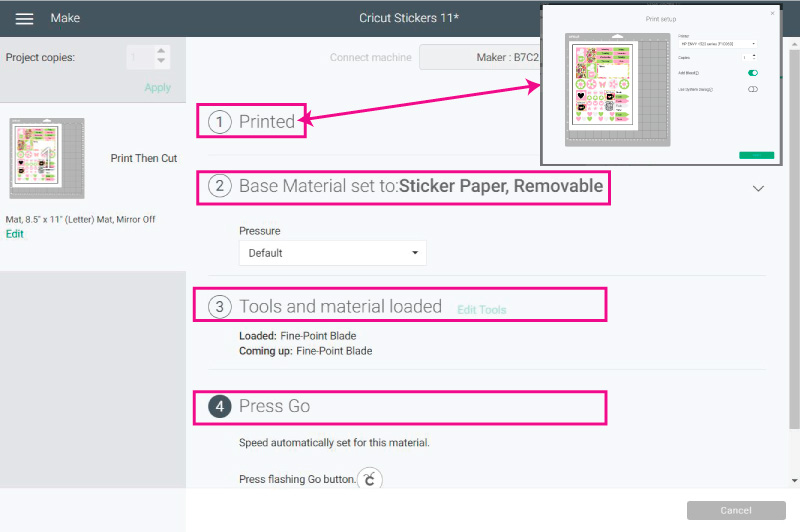
After you Print, it's time for y'all to select the sticker newspaper you are working with.
If yous have a Cricut Maker, browse all materials and type in "sticker" to narrow the search. I picked Sticker Paper, Removable because I didn't use Cricut's brand.
If you accept a Cricut Explore, move the smart set punch on your Cricut Machine and so browse materials on design infinite and choose the sticker paper y'all are working with.
Now let's move to real-life photos!
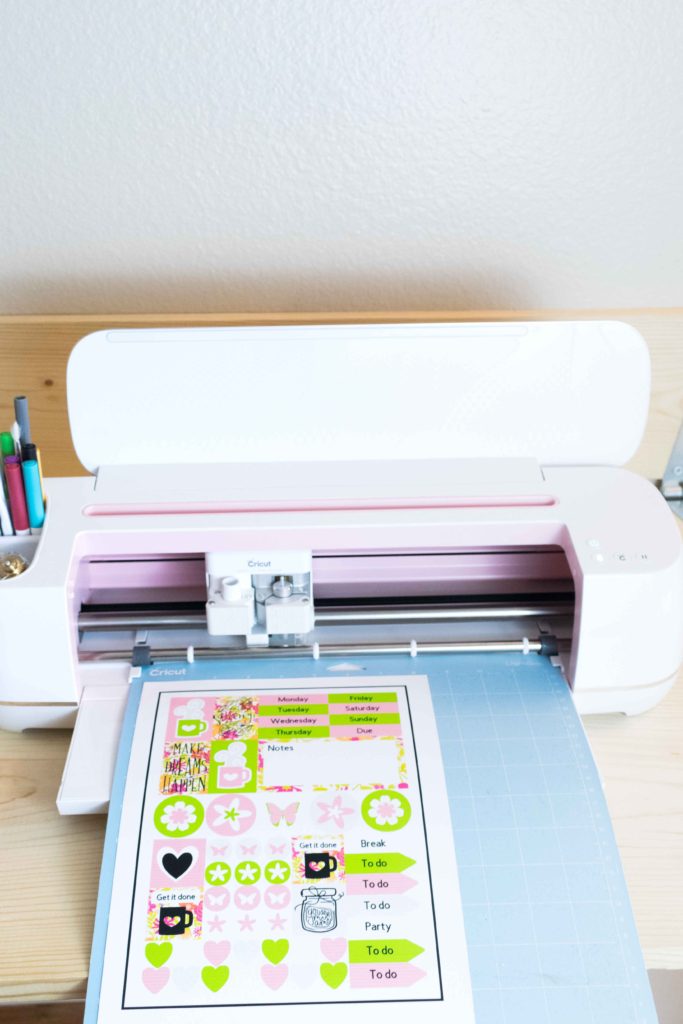
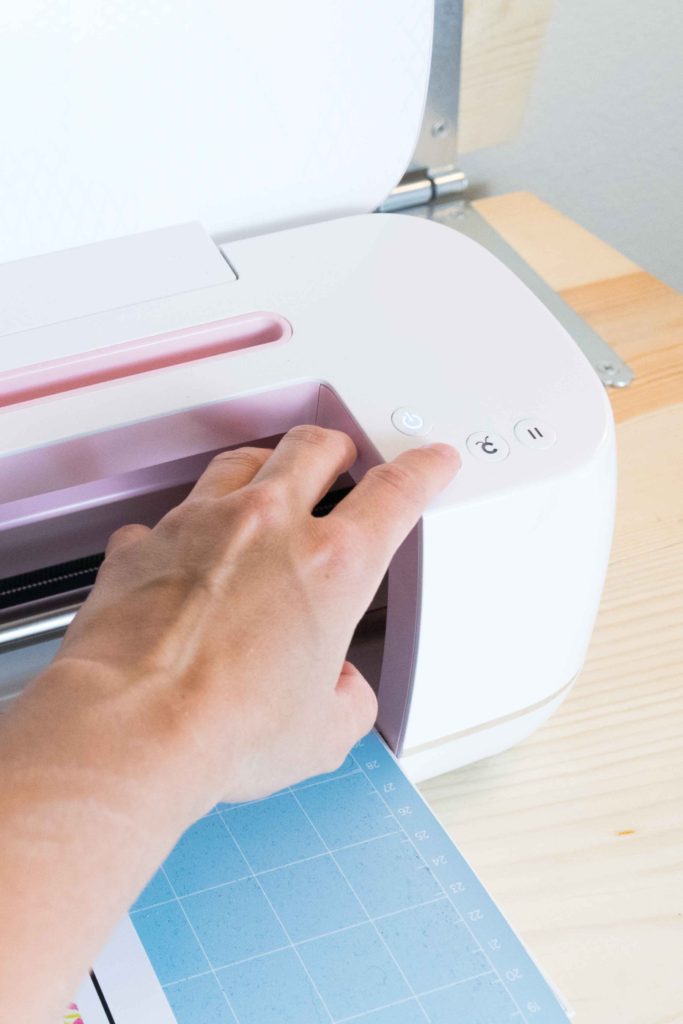
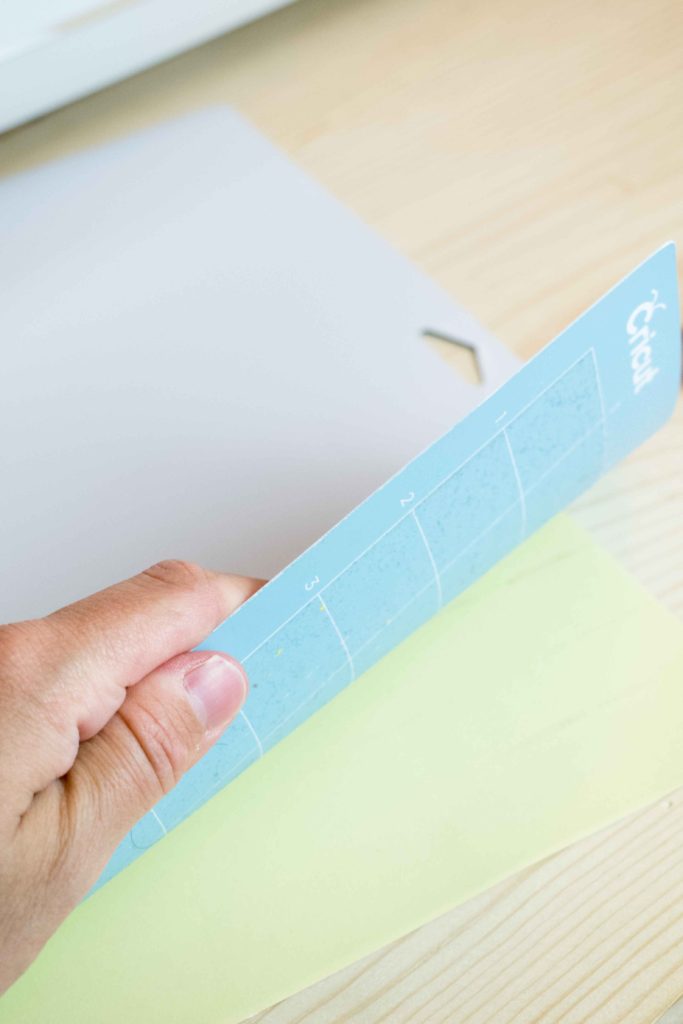
After selecting materials, install Fine Point Blade and place the already Printed Sticker Paper on your Mat, load it to your auto and press the flashing Get button on your device.
Run into the magic happen earlier your eyes!
When Design Space informs you that the cut is complete unload your Mat for the Cricut and finally remove sticker canvas from the Mat.
In that location you lot have it! Beautiful stickers you can use for your planning activities.
Using Layout Templates to Brand Cricut Stickers
If you lot've been reading my website, you know I love throwing extra goodies and SVG files to make your life easier.
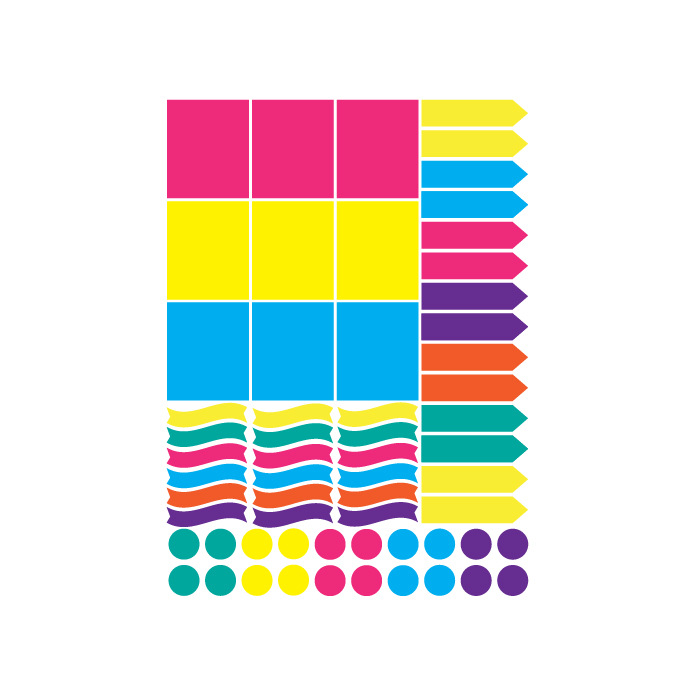
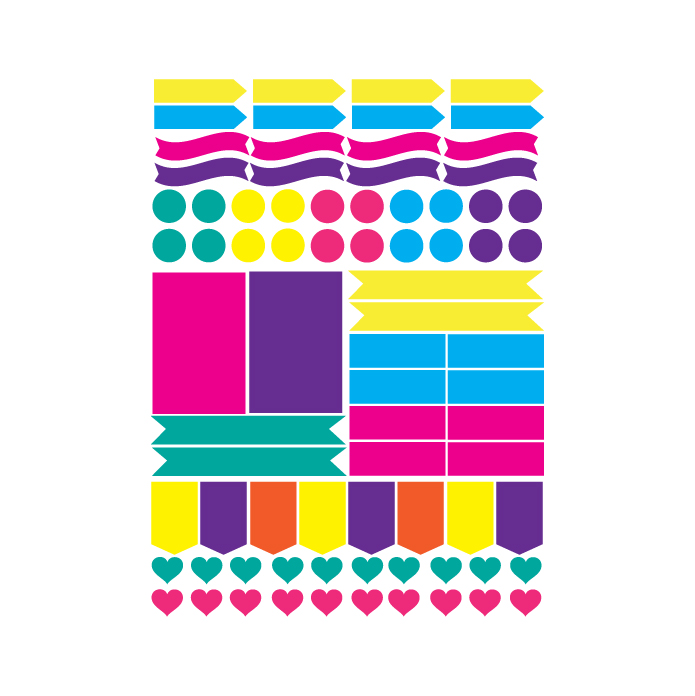
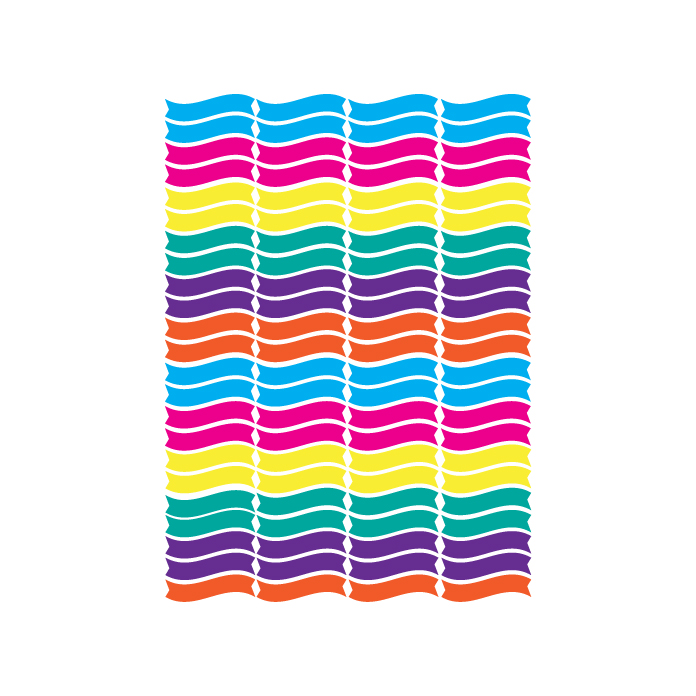
Hither I take half dozen dissimilar layouts you can utilise for your projects.
To download the files, you Need to exist on a desktop or laptop, and you must click on the push button to trigger a download file on your pc.
Depending on your browser settings, sometimes your PC will ask where to relieve the file, although, nearly times, the files will be in your download folder.
If the epitome opens in a new window (this may happen because of your browser settings), correct-click on it, select the selection "Save Epitome As," and choose where you want to save the file.
SVG files expect similar a web page file when you download them.
They already take colors, but feel costless to use the techniques I showed you lot higher up to personalize them however you lot desire!

I won't be roofing once again a step-by-step tutorial on how I did the next ones, but I volition show you how to upload them and employ these templates in Cricut Design Space.
My purpose with these files is to requite you extra resources and ideas to work with, so you don't feel intimidated and want to go for it!
Oh!
And only so y'all know, I also have a library total of costless SVG files and Printables for all of my subscribers, a.chiliad.a Daydreamers. You tin can see a preview right here or get access by filling out this form.
Upload Sticker Templates to Cricut Design Space
To upload your project, log in to Cricut Design Space, and click on to the Upload button located on the layers panel. Adjacent, click on "Upload Image" and select information technology from your estimator.
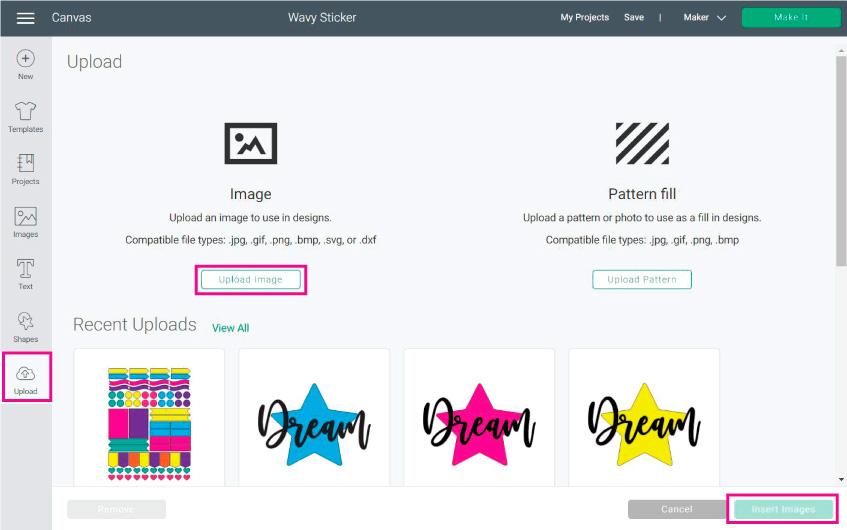
Once uploaded, the template will be under recently uploaded images. Select information technology and click on insert images.
All of these templates are sized correctly, so you don't take to worry about that. To edit every single shape on its own, you need to select the file and click on Ungroup (located at the summit of the Layers panel).
If yous notice, there is a curvy shape there. To add text to information technology follow the steps I show you in the screenshot right down below.
Now check this out!
Do yous encounter how different information technology looks? I used unlike colors and images to create a different feel.
This one is more of embankment and mermaid style stickers.
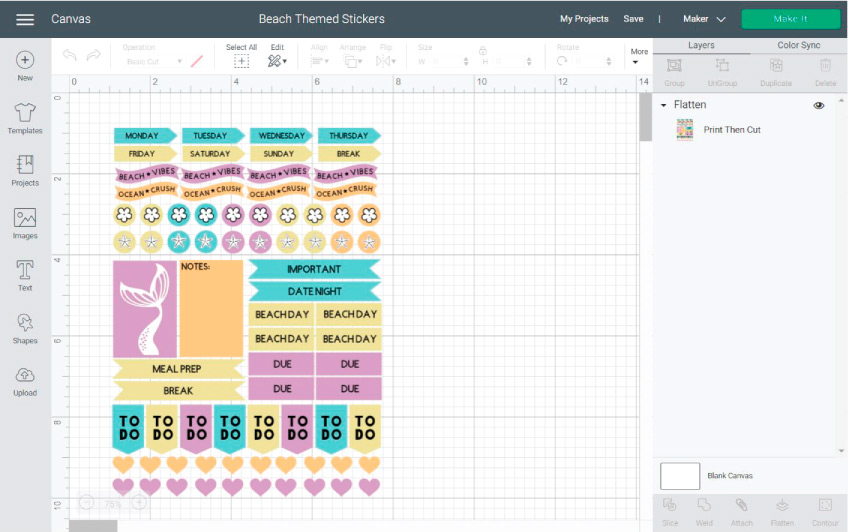
And just in case y'all are curious these are the codes of the images and colors I used:
- Colors: Blue (84D1D4) Peach (F6C785) Yellow (ECE09C) Regal (CA9CC1)
- Images: Mermaid Tail (#M111122A) / Flower (#M3F100) / Star Fish (#M1110734)
- Fonts: Cricut Sans / Cricut Font and Bones Shapes
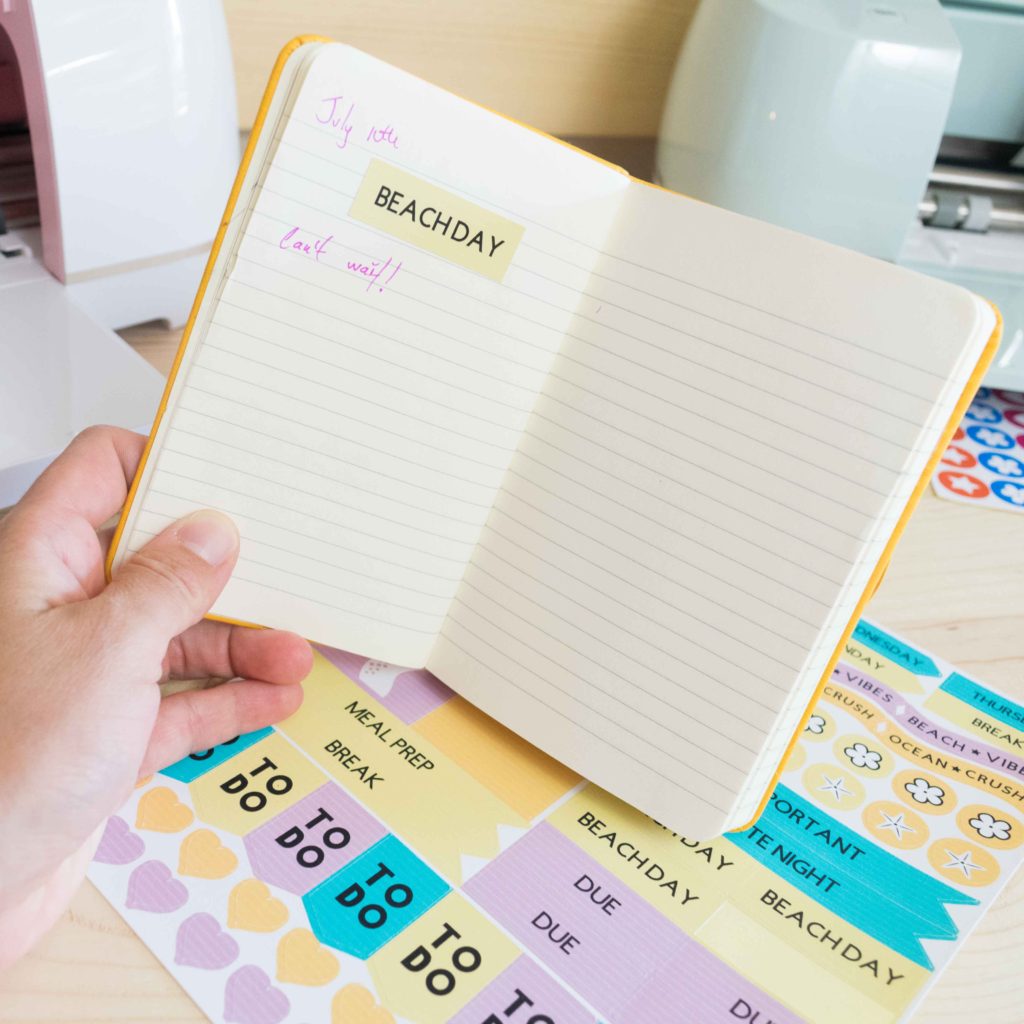
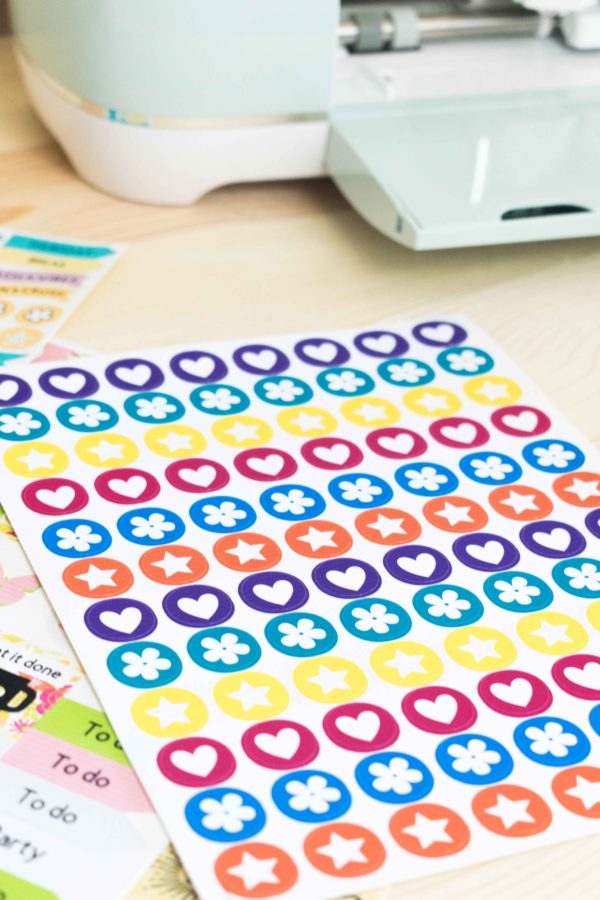
You tin also make a whole page of the same shape. These are perfect for marking your journals, or if you have kids, you can utilise them as a reward organization.
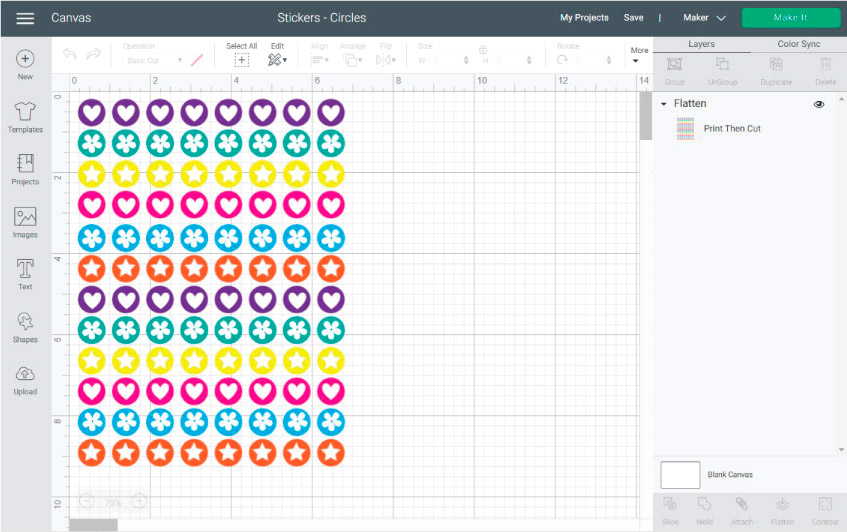
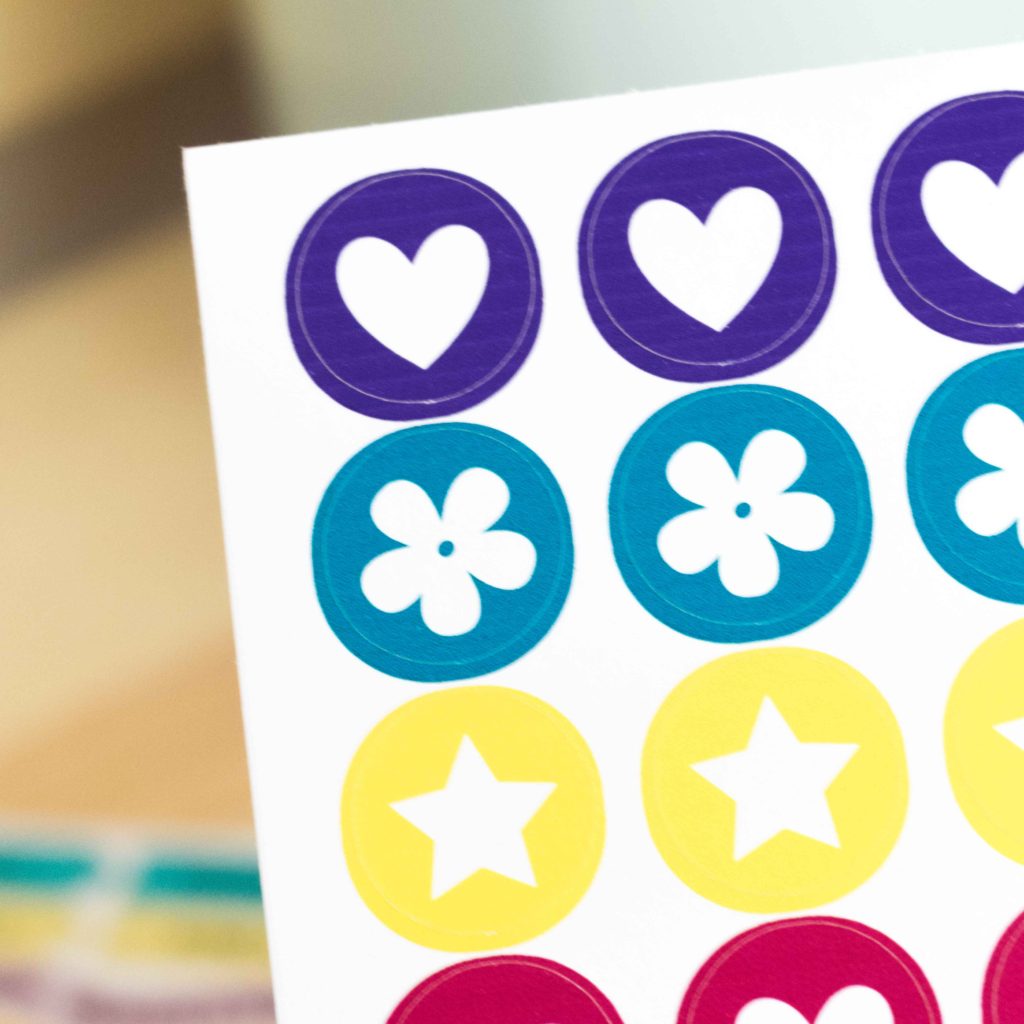
I used the circles' layout template and very basic shapes to put on top of them.
I love how vibrant and beautiful they look. Wouldn't you agree?
Images Used: centre, star, flower (#M3F100)

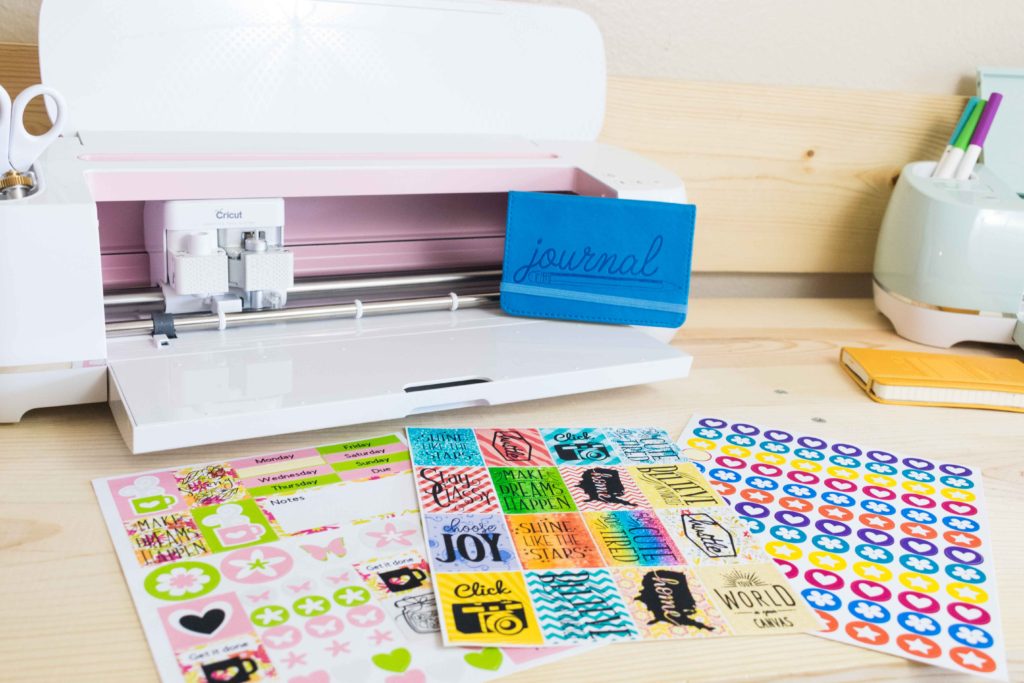
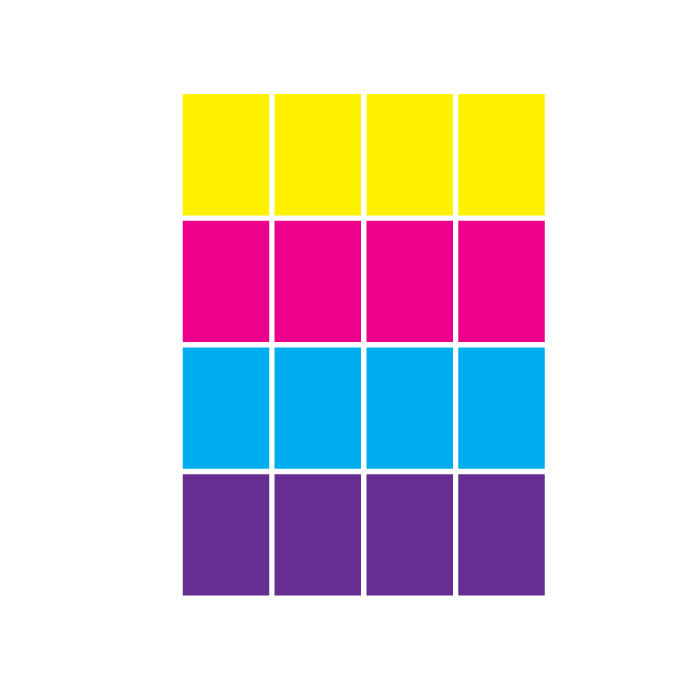
Last but not least, I want to prove you how to use layout that only has squares on it.
I really honey how It ended upward!
For this sticker sheet, I decided to simply utilise patterns for the background, and Free (at the time) Cricut Images. You can employ your quotes or text as well.
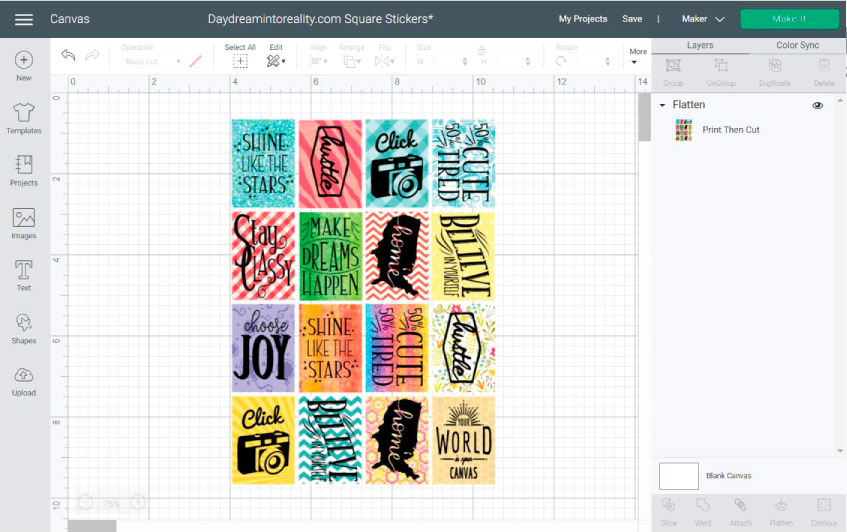
Patterns don't take a code, so you would need to scroll to find them (sorry). Only hither are following images I used:
- Smooth Like the Stars: #M3D9AEFB
- Hustle: #M7E83274
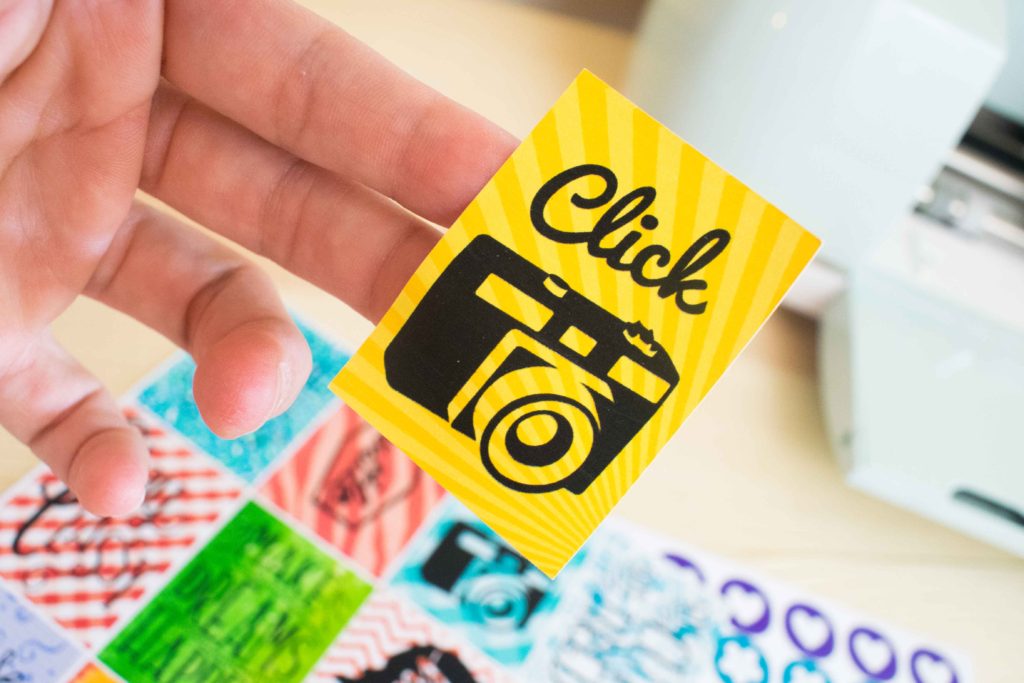
- Click: #M323BF
- 50% Beautiful 50% Tired: #M3D9ABEE
- Stay Classy: #M3D9AFA3
- Habitation: #M9C1E374
- Cull Joy: #M3D9AD86
- Make Dreams happen: #M3D9AE98
- Your World is your Sail: #M539A69
- Believe in yourself: #M33EA4C0
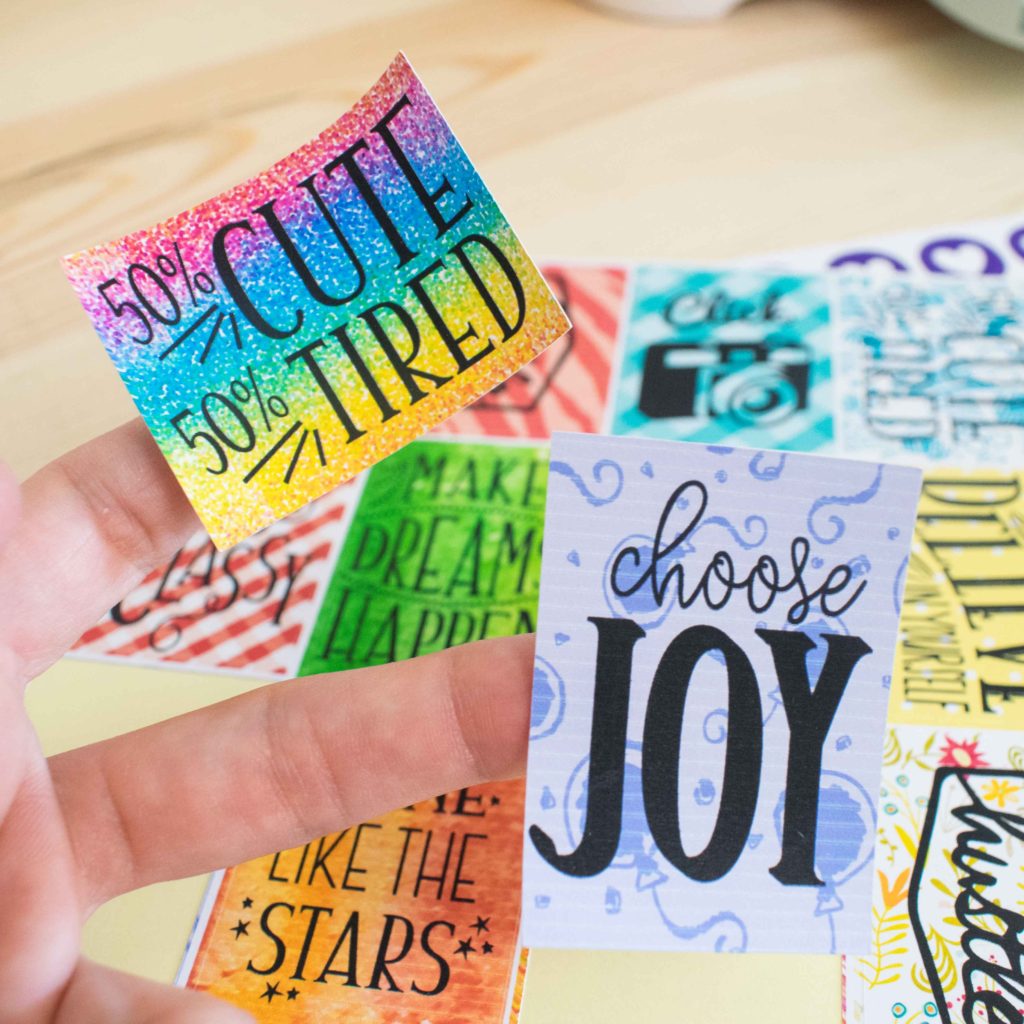
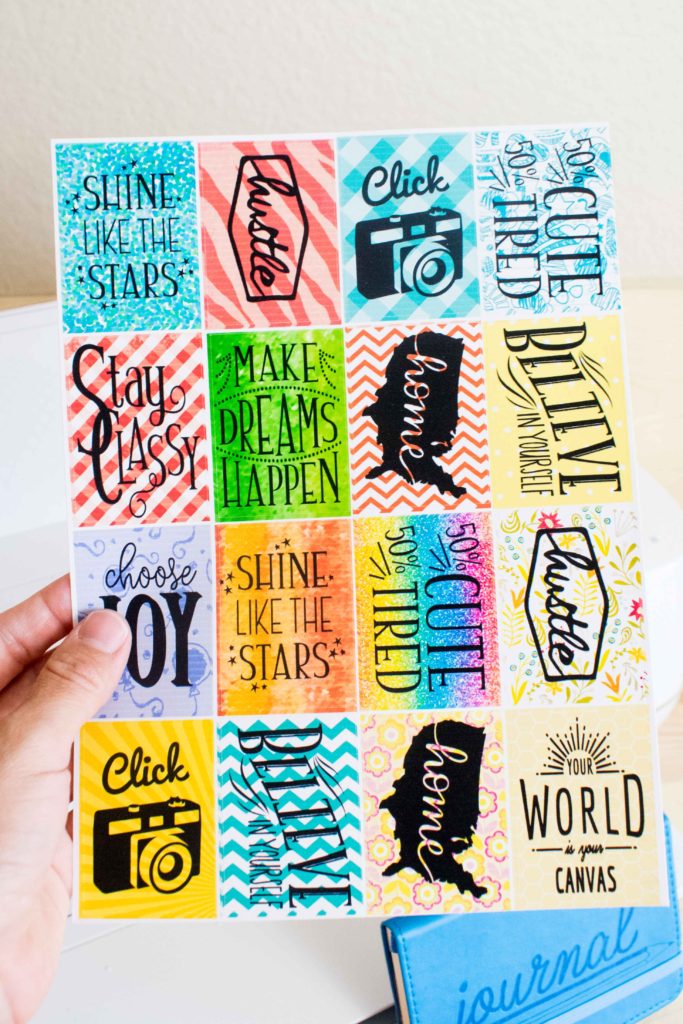
These last ones turned out then great. Pictures don't do it justice.
I think this sort of stickers can work as a present for a friend or someone you love. Yous tin can likewise add encouraging phrases, etc.!
What practice you lot think?
Congrats You are a Pro at Making Cricut Stickers!
Do you know that it takes me over 25 hours of work to complete a single Cricut article? I know, it's crazy! But I like to brand sure that you empathize EVERYTHING!
I would appreciate your back up on Instagram / Pinterest / YouTube / as I am trying to grow my audience to go on producing not bad content!
Source: https://www.daydreamintoreality.com/cricut-stickers/
Posted by: cartercamestich1950.blogspot.com
0 Response to "How To Make Triangle Stickers Youtube Silhouette"
Post a Comment